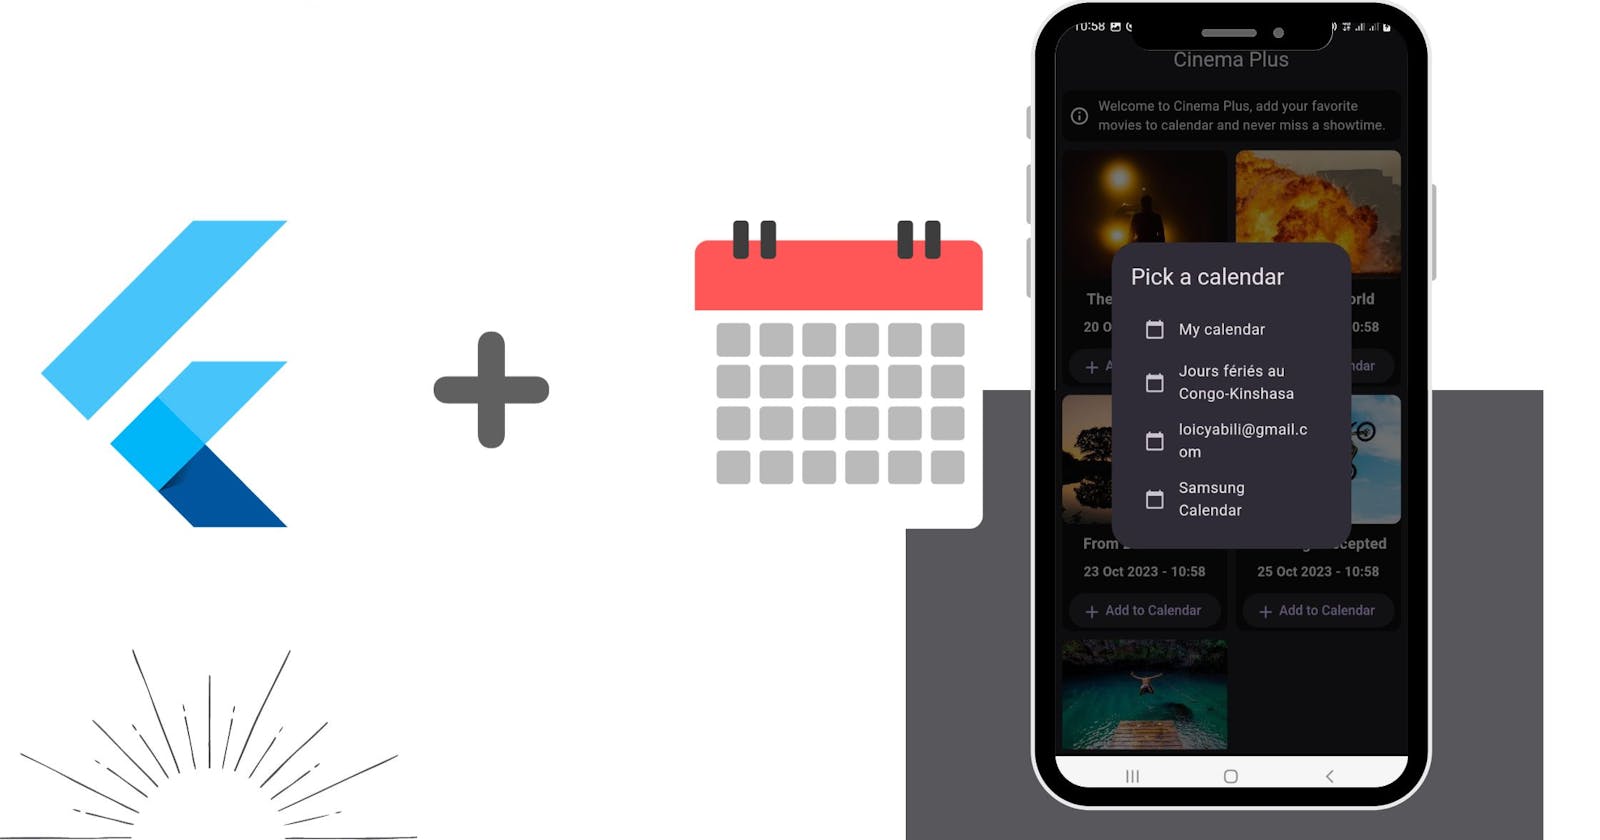


In this tutorial, we will see how to interact with the phone's calendars by adding events or by checking the events already added.
Project specification
To explain this concept we are going to create a small application for a cinema on a simple page where there will be a list of movies and their screening date.
The user can add the screening movie event to the calendar of their choice, if a movie has already been added to any of these calendars it will be impossible to add it a second time.
Here is how the final result will be:

Code architecture
We will use a simple MVC (Model-View-Controller) architecture.
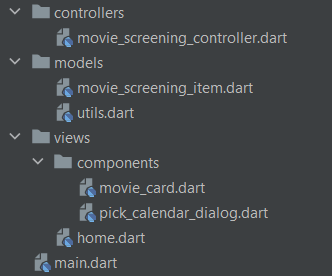
Model
The model that we called models contains the files relating to the data and their representation, in our project, we will have one model that we will call MovieScreeningItem (we will come back to it later).
You will notice the presence of a file called utils, this file will contain other elements such as constants or enumerations.
View
The view is called views in our project, this folder will contain everything related to the UI, and each file will somehow represent a screen of the application, in our case there will only be one (the home page).
There is a folder called components which will contain the different components of the UI which will help easily add them on several pages if necessary, in our project there will only be one component that represents the movie screening.
Controller
The controller links the model (data) and the view, it gets user input from the view, does the data processing then returns the response to the view.
In our project, we will only have one controller for movie screening.
User Interface
Let's see what our UI will look like; This is not the main goal of our project so we will do something simple.
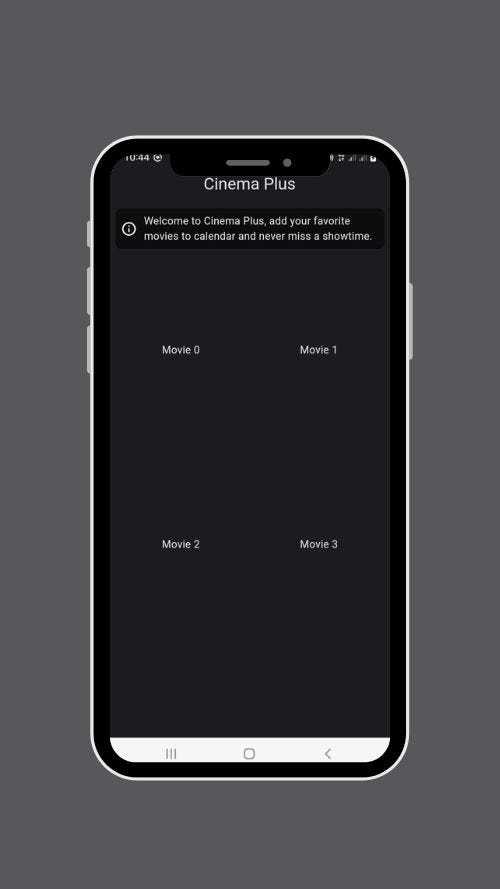
Home page initialization
We will create a simple page with a small message above (not necessary but we put it anyway 😄) and the list of movies in grid view, when loading data we will display a CircularProgresIndicator.
Let's create the home.dart file which will be in lib/views/
Here is the body of the page:
Padding(
        padding: const EdgeInsets.all(8.0),
        child: Column(
          children: [
            Container(
              decoration: BoxDecoration(
                color: Colors.black54,
                borderRadius: BorderRadius.circular(10),
              ),
              child: const Padding(
                padding: EdgeInsets.all(8.0),
                child: Row(
                  children: [
                    Icon(
                      Icons.info_outline_rounded,
                      color: Colors.white,
                    ),
                    SizedBox(width: 10,),
                    Expanded(
                      child: Text(
                        'Welcome to Cinema Plus, add your favorite movies to calendar and never miss a showtime.',
                        style: TextStyle(),
                      ),
                    ),
                  ],
                ),
              ),
            ),
            const SizedBox(height: 10,),
            Expanded(
              child: (isLoading)? const Center(child: CircularProgressIndicator(),):
              GridView.builder(
                gridDelegate: const SliverGridDelegateWithFixedCrossAxisCount(
                  crossAxisCount: 2,
                  childAspectRatio: 0.7,
                  crossAxisSpacing: 10,
                  mainAxisSpacing: 10,
                ),
                itemBuilder: (context, index) {
                  return Center(
                    child: Text('Movie $index'),
                  );
                },
              )
            ),
          ],
        ),
      )
You can see the complete code of the home page in its current state here.
The result is this:
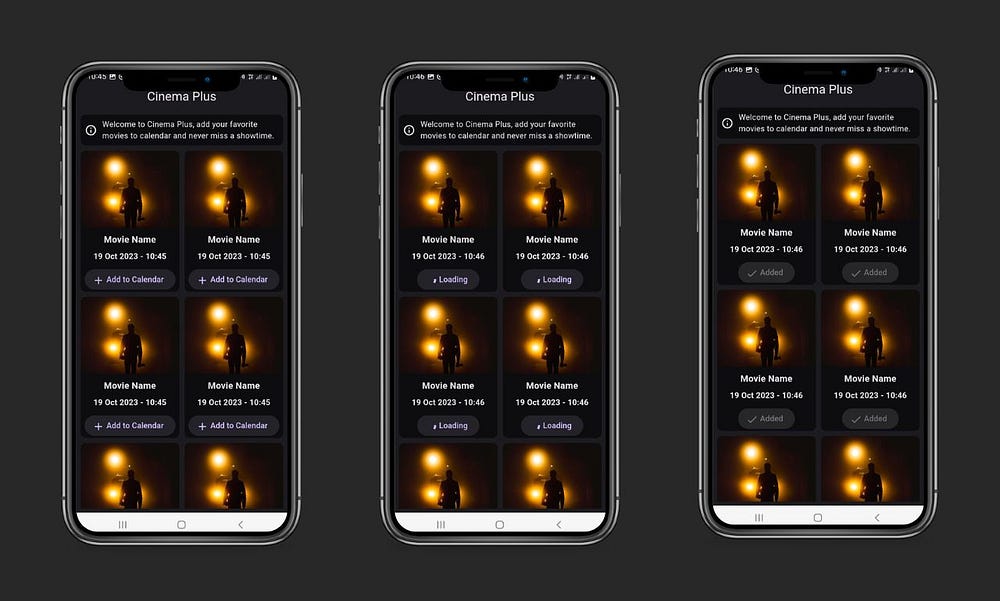
The "Movie Card" component
For the moment the important part of our page is almost empty, it is time to create the component (in lib/views/components) that will represent the movie. It will have an image, a title, a date, and a button for adding it to the calendar.
To make our app more beautiful, let's make the "add to calendar" button have different states:
Initial: the initial state of the button.
Loading: the loading status that will be displayed when the adding operation is performed.
Added: This status will show when our movie has already been added to the calendar.
To do this, what could be better than using enumerations? I wrote a blog on it that might interest you: Everything you need to know about Enum with Flutter and Dart.
We will create our enumeration in lib/models/utils.dart
enum MovieEventState {
  initial,
  loading,
  added,
}
The button's text and icon will change depending on the state of the enumeration.
Here is the function that retrieves the button icon depending on the state.
Widget get _loadingView {
    switch (state) {
      case MovieEventState.loading:
        return const Center(
          child: CircularProgressIndicator(),
        );
      case MovieEventState.added:
        return const Center(
          child: Icon(Icons.check),
        );
      case MovieEventState.initial:
        return const Center(
          child: Icon(Icons.add),
        );
    }
  }
The function that allows you to retrieve the button text based on the enumeration
String get buttonText {
  switch (state) {
    case MovieEventState.added:
      return 'Added';
    case MovieEventState.loading:
      return 'Loading';
    case MovieEventState.initial:
      return 'Add to Calendar';
  }
}
Finally here is the code of the Movie card:
Container(
  decoration: BoxDecoration(
    color: Colors.black54,
    borderRadius: BorderRadius.circular(10),
  ),
  child: Column(
    children: [
      Expanded(
        child: Container(
          decoration: BoxDecoration(
            borderRadius: BorderRadius.circular(10),
            image: const DecorationImage(
              image: AssetImage('assets/images/adventure.jpg'),
              fit: BoxFit.cover,
            ),
          ),
        ),
      ),
      const SizedBox(height: 10,),
      const Text(
        'Movie Name',
        style: TextStyle(
          fontSize: 16,
          fontWeight: FontWeight.bold,
        ),
      ),
      const SizedBox(height: 10,),
      Text(
        DateFormat(dateformat).format(DateTime.now()),
        style: const TextStyle(
          fontSize: 14,
          fontWeight: FontWeight.bold,
        ),
      ),
      const SizedBox(height: 10,),
      ElevatedButton.icon(
        onPressed: (state == MovieEventState.added)?
          null:
          () {

          },
        icon: SizedBox(
          height: 20,
          width: 20,
          child: _loadingView,
        ),
        label: Text(buttonText),
      ),
    ],
  ),
)
When a movie has already been added to the calendar, it should no longer be clickable, just set the onPressed property to null and Flutter will do the rest.
All we have to do now is to use our component on the home page like this:
GridView.builder(
  gridDelegate: const SliverGridDelegateWithFixedCrossAxisCount(
    crossAxisCount: 2,
    childAspectRatio: 0.7,
    crossAxisSpacing: 10,
    mainAxisSpacing: 10,
  ),
  itemBuilder: (context, index) {
    return MovieCard(key: Key('movie-$index'),);
  },
)
Find the complete code in its current state by clicking here.
The final result of our home page with the different states:
The pick calendar dialog
By clicking on "Add to calendar" you must display a dialog box to select the calendar on which you want to add the event. We will create this dialog in lib/views/components/pick_calendar_dialog.dart
SizedBox(
  width: MediaQuery.of(context).size.width * 0.5,
  height: MediaQuery.of(context).size.height * 0.3,
  child: ListView.builder(
    itemCount: 5,
    itemBuilder: (context, index) {
      return ListTile(
        leading: const Icon(Icons.calendar_today_rounded),
        title: Text('Calendar $index'),
        onTap: () {
          Navigator.pop(context, index);
        },
      );
    },
  ),
)
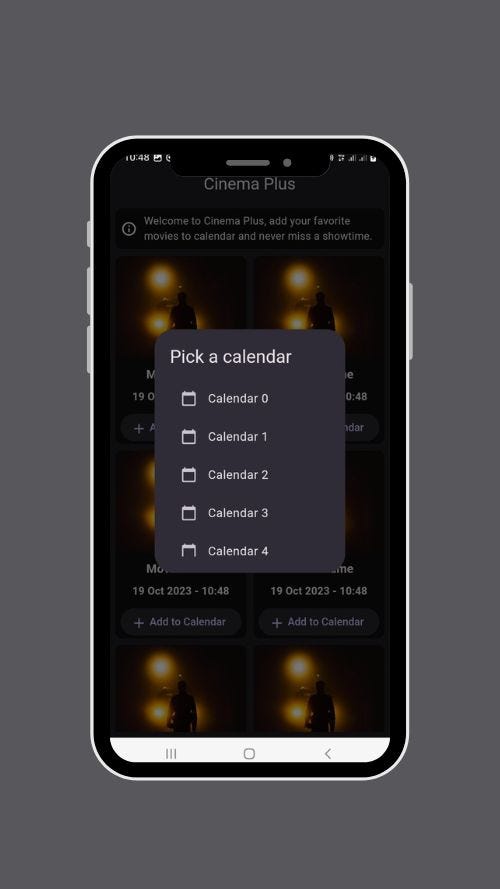
We can open our dialog box from the “Movie Card”.
showDialog(
  context: context,
  builder: (context) {
    return const AlertDialog(
      title: Text('Pick a calendar'),
      content: PickCalendarDialog(),
    );
  },
);
The result:
The complete source code of the UI is here.
The logic
With the GUI ready, let's move on to our application's logic.
The model
We will only need one class to represent a movie screening, we will call it MovieScreeningItem and we will put it in lib/models/movie_screening_item.dart.
The properties we need are the id, image, title, date, and state of our event.
class MovieScreeningItem {

  String id;
  String title;
  String imagePath;
  DateTime dateTime;
  MovieEventState state;

  MovieScreeningItem({
    required this.id,
    required this.title,
    required this.dateTime,
    required this.imagePath,
    this.state = MovieEventState.initial,
  });

}
You can find the complete code of our class here.
Package's integration
To manipulate the device calendar, we need to use an external library.
I recommend these two packages:
In this tutorial, I will use Device Calendar which is more complete compared to the other (which you can test if you want).
Let's start by adding the device_calendar package to pubspec.yaml
Due to an issue that is still not resolved at the time of writing this article (October 2023), the addition of the package will be done as follows:
device_calendar:
  git:
    url: https://github.com/builttoroam/device_calendar.git
    ref: 4.3.1
IOS
On IOS you must add the NSCalendarsUsageDescription and NSContactsUsageDescription keys in the ios/Runner/Info.plist file.
<key>NSCalendarsUsageDescription</key>
<string>Access most functions for calendar viewing and editing.</string>
<key>NSContactsUsageDescription</key>
<string>Access contacts for event attendee editing.</string>
Android
On Android, you must add the READ_CALENDAR and WRITE_CALENDAR permissions in the android/app/src/main/AndroidManifest.xml manifest just above the application tag.
<uses-permission android:name="android.permission.READ_CALENDAR" />
<uses-permission android:name="android.permission.WRITE_CALENDAR" />
It is possible that you encounter issues during the distribution of your application, to prevent this you must put the following line in a Proguard file android/app/proguard-rules.pro, to read more about this click here.
-keep class com.builttoroam.devicecalendar.** { *; }
That's it, the configuration is ready, and you can launch the project to check that everything is working fine. Click here to see the update made for the configuration.
The controller
As said above, we will only need one controller which we will call MovieScreeningController, and which we will put in lib/controllers/movie_screening_controller.dart.
Properties
We will need three properties:
the list of calendars.
the list of movie screenings
Finally, we need the property that will allow us to manipulate our calendars through the device_calendar package.
List<Calendar> calendars = [];
List<MovieScreeningItem> movieScreenings = [];
final DeviceCalendarPlugin _deviceCalendarPlugin = DeviceCalendarPlugin();
Initializing calendars
We must retrieve the calendars to be able to add events to them or check the events already added. To retrieve the calendars we use the retrieveCalendars method from our package which returns an object of the type Result which if everything went well will contain the calendars in its data property.
Future initCalendars() async {
  Result result = await _deviceCalendarPlugin.retrieveCalendars();

  for (ResultError error in result.errors) {
    debugPrint('======Error init calendars: ${error.errorCode} ${error.errorMessage}');
  }

  if (result.isSuccess) {
    calendars = result.data;
  }
}
Adding events to calendars
To add an event (in our case a screening of the movie), we will create a method that takes as parameters the concerned movie and the calendar on which we want to add the event.
We are going to call the createOrUpdateEvent method of the device calendar which takes an Event type object as a parameter, so we must convert our "movie screening item" into an "Event".
In the Event object, we must specify the start and end of the event. To ensure that the date will adapt to any time zone, these arguments take values of the TzDateTime type, so we need to convert our DateTime.
To get started, you need to add the timezone package, you can do this from the command prompt.
dart pub add timezone
Then let's import our package:
import 'package:timezone/timezone.dart' as tz;
Here is how to convert our DateTime into TzDateTime.
tz.TZDateTime.from(movieScreening.dateTime, tz.local)
Here is the complete source code of our add-to-calendar method:
Future<bool> addToCalendar(Calendar calendar, MovieScreeningItem movieScreening) async {

  // the process is too fast, so we add a delay to see the loading indicator
  await Future.delayed(const Duration(seconds: 2));

  Event event = Event(
    calendar.id,
    eventId: movieScreening.id,
    title: movieScreening.title,
    start: tz.TZDateTime.from(movieScreening.dateTime, tz.local),
    end: tz.TZDateTime.from(movieScreening.dateTime.add(const Duration(hours: 2)), tz.local),
  );

  Result<String>? result = await _deviceCalendarPlugin.createOrUpdateEvent(event);

  for (ResultError error in result?.errors?? []) {
    debugPrint('======Error add event to calendar: ${error.errorCode} ${error.errorMessage}');
  }

  if (result?.isSuccess?? false) {
    debugPrint('======Add event to calendar result: ${result?.data}');
    return true;
  }

  return false;
}
Retrieving events
If a movie has already been added to one of the calendars, we must change its state to "added", for this we must retrieve the events from the calendars at the time of the date of our movie and check if any of them corresponds to our movie.
Here is our method:
Future<bool> checkEventExist(MovieScreeningItem movieScreening) async {
  for (Calendar calendar in calendars) {
    Result<List<Event>>? result = await _deviceCalendarPlugin.retrieveEvents(calendar.id, RetrieveEventsParams(startDate: movieScreening.dateTime, endDate: movieScreening.dateTime.add(const Duration(hours: 2))));

    for (ResultError error in result.errors) {
      debugPrint('======Error check event exist: ${error.errorCode} ${error.errorMessage}');
    }

    if (result.isSuccess) {
      for (Event event in result.data?? []) {
        if (event.title == movieScreening.title) {
          return true;
        }
      }
    }
  }

  return false;
}
To check that the event corresponds to our movie screening, we use the title just to show how it works but the best option is to use the id as a reference for this you must save the event's id (which is returned after adding to the calendar) in your database.
Data initialization
When launching the application you must initialize the movies and calendars.
For movies we will create them manually, then we will call checkEventExist on each item to check if it has already been added or not.
Future initScreenings() async {
  movieScreenings = [
    MovieScreeningItem(
      id: 'movie-screening-1',
      title: 'The last samurai',
      imagePath: 'assets/images/adventure.jpg',
      dateTime: DateTime.now().add(const Duration(days: 1)),
    ),
    MovieScreeningItem(
      id: 'movie-screening-2',
      title: 'End of the world',
      imagePath: 'assets/images/explosion.jpg',
      dateTime: DateTime.now().add(const Duration(days: 3)),
    ),
    MovieScreeningItem(
      id: 'movie-screening-3',
      title: 'From zero to hero',
      imagePath: 'assets/images/jump.jpg',
      dateTime: DateTime.now().add(const Duration(days: 4)),
    ),
    MovieScreeningItem(
      id: 'movie-screening-4',
      title: 'Challenge accepted',
      imagePath: 'assets/images/moto.jpg',
      dateTime: DateTime.now().add(const Duration(days: 6)),
    ),
    MovieScreeningItem(
      id: 'movie-screening-5',
      title: 'Bad vacation day',
      imagePath: 'assets/images/nature.jpg',
      dateTime: DateTime.now().add(const Duration(days: 10)),
    ),
  ];

  for (MovieScreeningItem movieScreening in movieScreenings) {
    movieScreening.state = await checkEventExist(movieScreening)? MovieEventState.added : MovieEventState.initial;
  }

}
Now let's create a method that will be called on the app start in which we will initialize the calendars and other data.
init() async {
  await initCalendars();
  await initScreenings();
}
Our controller is finally ready 😮💨you can see its full code here.
From the controller to the UI
It's time to grab the data from our controller and assign it to our UI.
The movie card
lib/views/components/movie_card.dart
Let's start by editing our "Movie Card" which will now take the item concerned as an argument.
At the stateful widget level, we will now have:
final MovieScreeningItem item;

const MovieCard({super.key, required this.item});
We will need to edit our item when it is added to a calendar, to do this let's create a copy of our item in _MovieCardState.
late MovieScreeningItem item;

@override
void initState() {
  super.initState();
  item = widget.item;
}
Now let's replace the constant values with those of our item (title, imagePath, state, dateTime).
...

Text(
  DateFormat(dateformat).format(item.dateTime),
  style: const TextStyle(
    fontSize: 14,
    fontWeight: FontWeight.bold,
  ),
)

...
See here the complete source code of the page.
lib/views/home.dart
Let's get our data from the controller and display them on the home page.
bool isLoading = true;
MovieScreeningController controller = MovieScreeningController();

@override
void initState() {
  super.initState();
  initData();
}

initData() async {
  setState(() {
    isLoading = true;
  });
  await controller.init();
  setState(() {
    isLoading = false;
  });
}
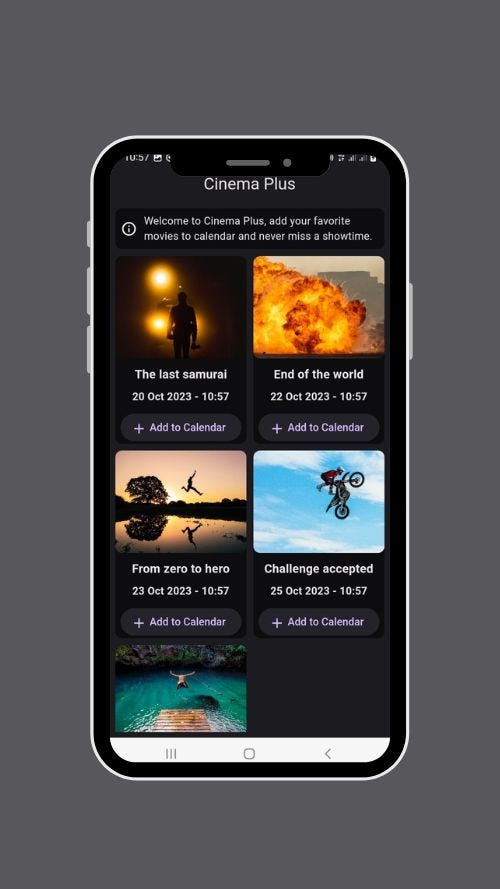
At this stage our controller contains the items, all we have to do is assign them to our “Movie Card”:
Expanded(
  child: (isLoading)? const Center(child: CircularProgressIndicator(),):
  GridView.builder(
    itemCount: controller.movieScreenings.length,
    gridDelegate: const SliverGridDelegateWithFixedCrossAxisCount(
      crossAxisCount: 2,
      childAspectRatio: 0.7,
      crossAxisSpacing: 10,
      mainAxisSpacing: 10,
    ),
    itemBuilder: (context, index) {
      return MovieCard(
        key: Key(controller.movieScreenings[index].id),
        item: controller.movieScreenings[index],
      );
    },
  )
)
Here is the complete code of our home file.
Once you run the code, you should have this:
Calendars
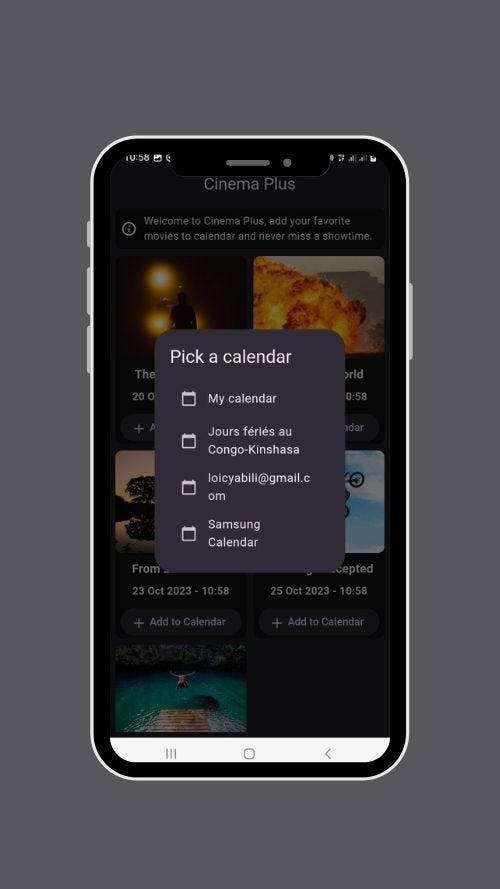
We need to display the calendars on our dialog box. Since our controller on the home page already contains the list of calendars, we do not have to reload them, we can just pass them as an argument.
The constructor of our dialog box will be:
final List<Calendar> calendars;

const PickCalendarDialog({Key? key, required this.calendars}) : super(key: key);
All we have to do now is to assign the calendars:
ListView.builder(
  itemCount: widget.calendars.length,
  itemBuilder: (context, index) {
    return ListTile(
      leading: const Icon(Icons.calendar_today_rounded),
      title: Text(widget.calendars[index].name?? ''),
      onTap: () {
        Navigator.pop(context, widget.calendars[index]);
      },
    );
  },
)
On the calendar's click, the dialog box is closed and returns the selected calendar.
The complete source code of the dialog is here.
As we launch the dialog box from the "Movie Card", we must first pass the controller as a MovieCard argument before passing it to the dialog box.
MovieCard
final MovieScreeningController controller;
final MovieScreeningItem item;

const MovieCard({super.key, required this.item, required this.controller});
then we can call the pick calendar dialog like this
showDialog(
  context: context,
  builder: (context) {
    return AlertDialog(
      title: const Text('Pick a calendar'),
      content: PickCalendarDialog(calendars: widget.controller.calendars),
    );
  },
)
The MovieCard call on the home page:
MovieCard(
  key: Key(controller.movieScreenings[index].id),
  controller: controller,
  item: controller.movieScreenings[index],
)
Once you click on "Add to calendar", this is the result you should have:
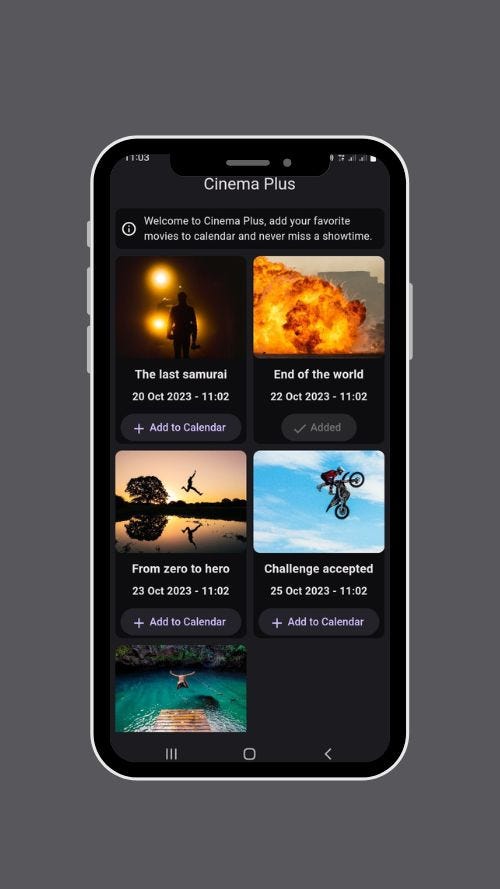
Add events to the calendar
Most of the job has already been done, now we just need to use the method of adding our controller to the MovieCard and that's it 😊.
showDialog(
  context: context,
  builder: (context) {
    return AlertDialog(
      title: const Text('Pick a calendar'),
      content: PickCalendarDialog(calendars: widget.controller.calendars),
    );
  },
).then((value) {
  if (value is Calendar) {
    setState(() {
      item.state = MovieEventState.loading;
    });

    widget.controller.addToCalendar(value, item,).then((value) {

      if (value) {
        setState(() {
          item.state = MovieEventState.added;
        });
      }
      else {

        // show error message in snackbar
        ScaffoldMessenger.of(context).showSnackBar(
          const SnackBar(
            content: Text('An error occurred while adding to calendar'),
          ),
        );

        setState(() {
          item.state = MovieEventState.initial;
        });
      }

    });
  }
});
When the user clicks on "Add to calendar" we start by displaying the pick calendars dialog, once the user selects a calendar we can start the adding process by changing the loading state to true. If everything went well we set the state to "added", otherwise we display an error message.
Finally, the final result when we have already added an element to the calendar:
Source Code
The complete source code for this tutorial is available on GitHub at this link. Don't hesitate to give me a star ⭐ to encourage me to continue.
References
https://en.wikipedia.org/wiki/Model%E2%80%93view%E2%80%93controller