AI with Flutter and Dart: boost your applications with Gemini
This article is dedicated to integrating the Gemini API with Flutter and Dart. We will soon witness the vast potential of Gemini and its seamless integration into Flutter.
You can view the demo, to have an overview of what we will talk about in this article.
Prerequisites
This article is based on the Gemini API, You should have Flutter and Dart notions to understand it well.
What is Gemini?
Gemini is a suite of generative artificial intelligence models created by Google to initially power its products including its Bard chatbot (which is now called Gemini).
Gemini is “multimodal” which means that it can generate content from different types of content such as text, images, and even videos and audio (with Gemini 1.5 which is not yet usable with the 'API at the time of I am writing this article — April 2024).
In this article we will focus on two models:
Gemini Pro
This is the most basic model that allows you to generate text from text; his identifier is gemini-pro.
Gemini Pro Vision
This model, in addition to generating text from text, can also generate it from images and even from text and images combined; it has gemini-pro-vision as identifier.
Why integrate Gemini into your application?
Gemini API integration can be useful for developers to facilitate certain tasks by taking advantage of the power of artificial intelligence.
Here is a non-exhaustive list of use cases:
A chatbot that only answers questions related to the products you sell in your app.
Automatic translation of comments posted by users in your application.
Automatic removal of hateful or other kind of comments from your application.
Automatic classification of a positive or negative review on a product in your application.
As you can see, there are endless possibilities of things you can do with the Gemini API without having any in-depth knowledge of machine learning or deep learning. Your only limit is your imagination 😊.
Installation
We will first install the development tools before testing; It is assumed that you have the entire Flutter environment ready to use.
You need to add the package google_generative_ai in your pubspec.yaml file.
Get the API key
To use the Gemini API, it is mandatory to have an API key; you can get it from Google AI Studio.
Using the key
It is essential to protect it by ensuring that it is not publicly visible. In Flutter we will place the key directly in the source code launch command which will be:
flutter run --dart-define=API_KEY=$YOUR_API_KEY
Replace $YOUR_API_KEY with your API key.
In case you want to generate the Apk, app bundle, ipa,… you also have to pass your key parameter in the command as follows;
flutter build ipa --dart-define=API_KEY=$YOUR_API_KEY
We can then get the key without having to display it in the code:
const apiKey = String.fromEnvironment('API_KEY', defaultValue: '');
In IDEs such as Android Studio or VS Code, you can configure this command.
Android Studio
Open your project
Click on the “main.dart” drop-down list above your window.
Click “Edit Configurations…”
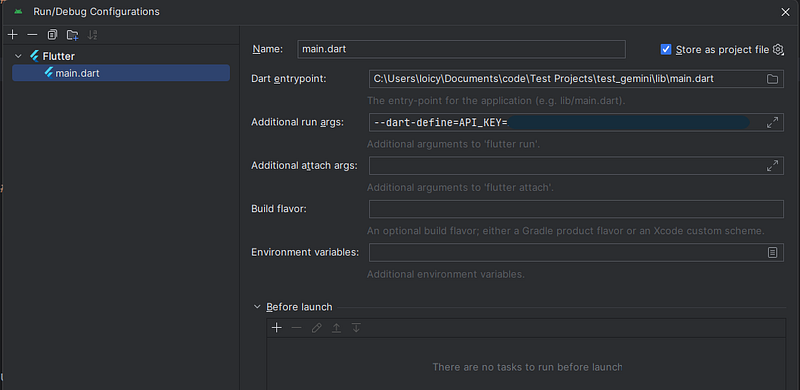
In the “Additional run args” field, add “ — dart-define= API_KEY=$YOUR_API_KEY”
Click on “Apply” then “Ok”.
Your configuration should look like this:
Visual Studio Code
Open the project
Click “Run and Debug” in the left sidebar.
Click “create a launch.json file”.
Select “Dart & Flutter”
Add
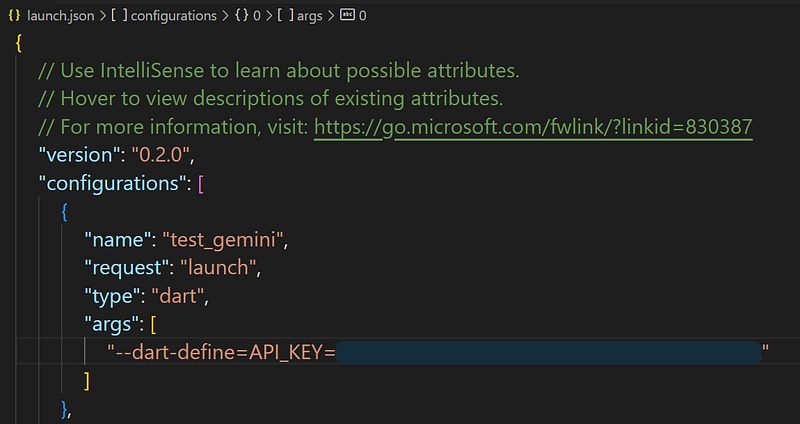
“args”: [“ — dart-define=API_KEY=$YOUR_API_KEY”]in the first configurations object.Save the file.
Your configuration file should look like this:
Practical tests
Now it's time to practice.

The tests are divided into four categories;
Generate text from text-only input
Generate text from text-and-image input
Build multi-turn conversations (chat)
Use streaming for faster interactions
Generate text from text-only input
As said above, the gemini-pro model allows you to generate text from text. You provide your prompt to the model and it returns a text response 😎.
const apiKey = String.fromEnvironment('API_KEY', defaultValue: '');
// user gemini-pro model
final model = GenerativeModel(model: 'gemini-pro', apiKey: apiKey);
final content = [Content.text(input)];
final response = await model.generateContent(content);
output = response.text?? 'No response';
We initialize our API key which we pass with the model identifier as arguments of the GenerativeModel constructor, then we pass the prompt as an argument of the generateContent method and finally we wait for the result that can be retrieved as text.
It is possible to place several contents (Content) in generateContent, for example above the user prompt, you can add other contents which represent the instructions you give to the model to improve results.
Here is the result:

The full source code is on GitHub, the link is at the end of this article.
Generate text from text-and-image input
To generate text from text and images, you must use the gemini-pro-vision model.
It can take up to 16 images in a single request, these images must have one of the following formats: PNG, JPEG, WEBP, HEIC, HEIF.
Images are sent in the bytes through the Uint8List class, so it is important to convert our images before passing them as a parameter, we create a function for this.
Future<Uint8List?> getImageBytes(String assetPath) async {
    try {
      ByteData byteData = await rootBundle.load(assetPath);
      return byteData.buffer.asUint8List();
    }
    catch (e) {
      debugPrint('Error loading image: $e');
    }
    return null;
  }

}
In our example, we are getting images from assets, you can also use uploaded images or get them from links, as long as you can convert them to Uint8List before.
Here is our code:
const apiKey = String.fromEnvironment('API_KEY', defaultValue: '');

// for text and image input, use gemini-pro-vision model
final model = GenerativeModel(model: 'gemini-pro-vision', apiKey: apiKey);
final (firstImage, secondImage, thirdImage) = await (
  getImageBytes('assets/images/image-input-1.png'),
  getImageBytes('assets/images/image-input-2.png'),
  getImageBytes('assets/images/image-input-3.png'),
).wait;

if (firstImage == null || secondImage == null || thirdImage == null) {
  output = 'Error loading images';
  return;
}

final response = await model.generateContent([
  Content.multi(
    [
      TextPart(input),
      DataPart('image/png', firstImage),
      DataPart('image/png', secondImage),
      DataPart('image/png', thirdImage),
    ]
  )
]);

output = response.text?? 'No response';
We initialize the gemini-pro-vision model by also passing the API key as a parameter.
We first convert our 3 images from the assets using the created method and we check if the conversion worked, otherwise, we stop the execution.
Then we use the same generateContent method to which we give content, this time we use Content.multi for text and images at the same time. We use TextPart for text and DataPart for other data such as images in our case. (it will be possible later to put audio or even videos).
Finally, we get the result of our query in response.text.
The result:

Build multi-turn conversations (chat)
In previous tests, each prompt had its results and did not depend on previous ones; in a conversation case, the messages depend on each other.
Gemini allows you to do this from the model's startChat method, it is even possible to give a conversation history which will allow the model to adapt its responses to this history; then Gemini manages the rest of the conversation alone.
To manage messages more easily, we create a MessageItem class.
class MessageItem {

  final String text;
  final bool isSender;

  MessageItem(this.text, this.isSender);

  Content get content {
    if (isSender) {
      return Content.text(text,);
    }
    return Content.model([TextPart(text)]);
  }

}
Through isSender, we can know if it is the model's message or the user's message and we can place it in the appropriate place.
We also create a content property that allows us to retrieve the content to send to the model, we use Content.text for the user and Content.model for the model (this can only be passed manually to the model in history messages, and then the model generates its messages on its own).
Initialization
const apiKey = String.fromEnvironment('API_KEY', defaultValue: '');
final model = GenerativeModel(
  model: 'gemini-pro',
  apiKey: apiKey,
  generationConfig: GenerationConfig(maxOutputTokens: 5000)
);

messages = [
  MessageItem('Hello how can I help you?', false),
  MessageItem('Hello,', true),
];

chat = model.startChat(
  history: List.generate(messages.reversed.length, (index) => messages.reversed.toList()[index].content),
);
We initialize the gemini-pro model by also passing the API key as a parameter.
IIt is also possible to use gemini-pro-vision in case you want to send images but for the moment the results are not effective in the case of a chat.
During initialization, you probably noticed an argument that we didn't talk about at the moment generationConfig, it allows you to personalize the default configurations of the model; in our example, we limit the total output tokens to 5000.
Tokens are a groups of characters or words that a model can receive or return, each model has its limits which you can see in the documentation.
Limiting the number of incoming or outgoing tokens can be useful, for example in a case where you would like to have short answers or to limit requests per user and avoid having a large bill.
Gemini has a method to count tokens from characters, see Count tokens for more details.
We initialize the chat through the model's startChat method by giving it a message history (optional), the first message in the array is the model's response to the last message which is labeled as the user's message.
The array is reversed to properly display it in a ListView in the UI.
As said above, initializing messages can be useful if you want the model to respond in a certain way to future messages.
Sending messages
MessageItem newMessage = MessageItem(input, true);

messages.insert(0, MessageItem(input, true));

final response = await chat.sendMessage(newMessage.content);

if (response.text?.isNotEmpty?? false) {
  messages.insert(0, MessageItem(response.text!, false));
}
Sending messages is easier than the chat initialization 😊. We add a MessageItem object at the start of the array with the user's text, then we send it through the sendMessage method which takes the content as a parameter and returns the content of the response which we also add to the array as a model's response.
Markdown
Before moving on to the next step, I would like to talk about markdown.
When Gemini returns a long text, it returns it in the markdown format which is a lightweight markup language that allows you to format the text.
You can sometimes have this kind of answer:
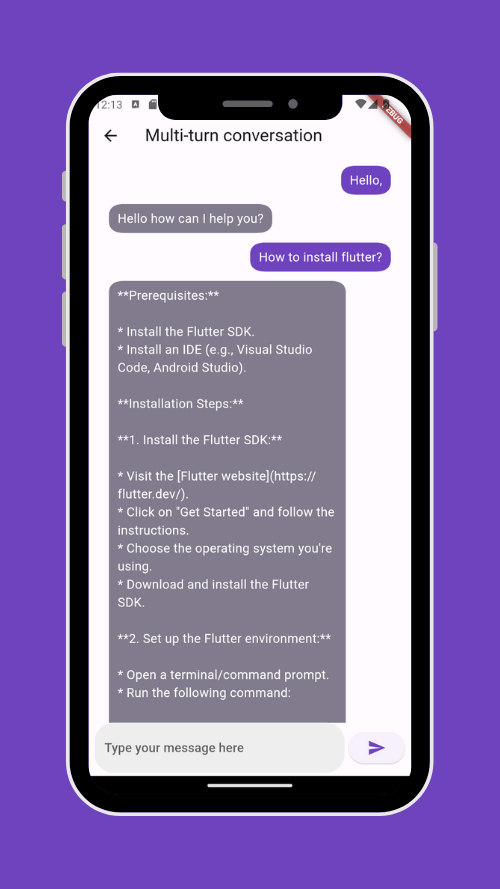
As you can see, Gemini used markdown in the answer; displaying the message in this way to the user is not appropriate.
We will therefore use the package flutter_markdown which allows you to format this language.
It can be used in this way:
MarkdownBody(
  data: text,
  onTapLink: (text, href, title) {
    // open link
  },
  styleSheet: MarkdownStyleSheet(
    p: textStyle,
    a: textStyle.copyWith(
      color: Theme.of(context).colorScheme.primary,
    ),
    textAlign: WrapAlignment.start,
  ),
)
Once we use it, our text is formatted as it should.
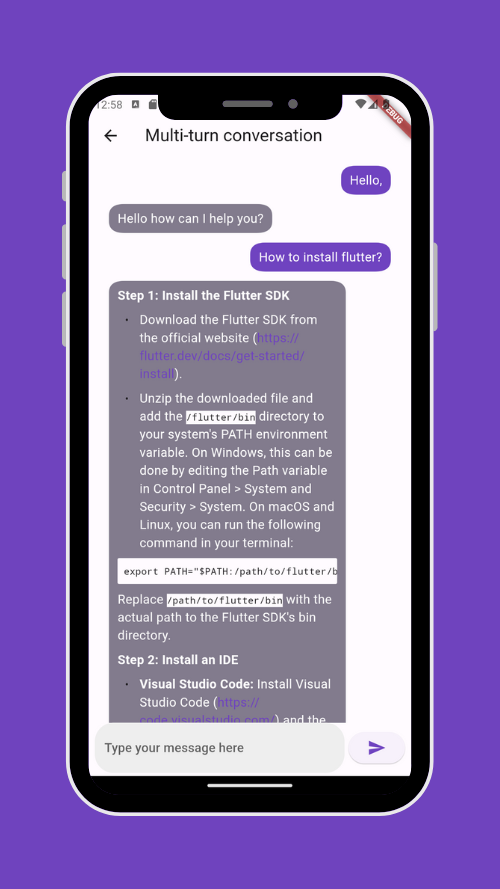
Here is the full demo of this section:

Use streaming for faster interactions
When you use Gemini Chat, Chat GPT, or Microsoft Copilot, you will notice that the response comes gradually; it is also possible to do this with the Gemini API.
By default, the model returns the response after completing the entire generation process which can be slow for the user, streaming will send the response part by part which will allow the user to start reading without having to wait for the full response.
To illustrate this, we will use the chat example, the initialization is done the same way, the difference will be in the sending of the message.
MessageItem newMessage = MessageItem(input, true);

messages.insert(0, MessageItem(input, true));

final response = chat.sendMessageStream(newMessage.content);
messages.insert(0, MessageItem('', false));

await for (final chunk in response) {
  String text = messages[0].text + (chunk.text?? '');
  messages[0] = MessageItem(text, false);
}
Rather than using sendMessage, we use sendMessageStream to receive the response in chunks.
Once we have the answer, we listen to it and update the message by adding the text of the generated chunk.

For simple generation of text from text or from images, you can use the
generateContentStreammethod rather thangenerateContent.
Google AI Studio
Google AI Studio is a web browser-based IDE that allows you to test your prompts, and modify them to have better responses before integrating them into your code.
To test prompts with Google AI Studio, you don't need an API key, so you can do as many tests as you want without being charged.
It also allows you to see in real-time the number of tokens used; which will allow you to better configure this in your code.
It is possible to directly export the source code in cURL, Javascript, Python, Kotlin, and Swift. Unfortunately, it is not yet possible to export the code to Dart at the time I am writing this article; you can refer to the Javascript code which is quite similar.
Google AI Studio offers 3 types of tests:
Freeform prompts
Structured prompts
Chat prompts
Freeform prompts
It allows you to create different types of tests to allow you to check the effectiveness of your prompts. It can take text or images based on the model that you specify.
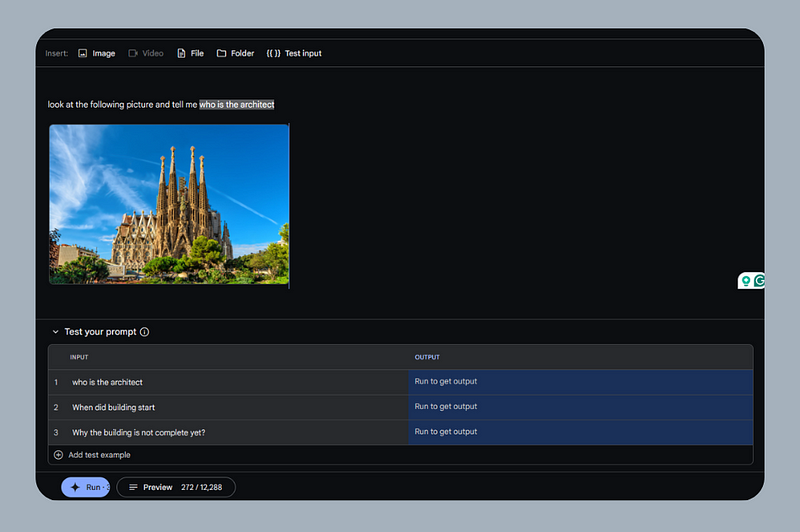
On this capture, we do a test on an image with several possible inputs. You can specify an input, by selecting the text of your prompt and then clicking “Text Input”.
Once you click “Run”, you will see the answers related to the specified entries, so you can modify your prompt if the answers do not suit you.
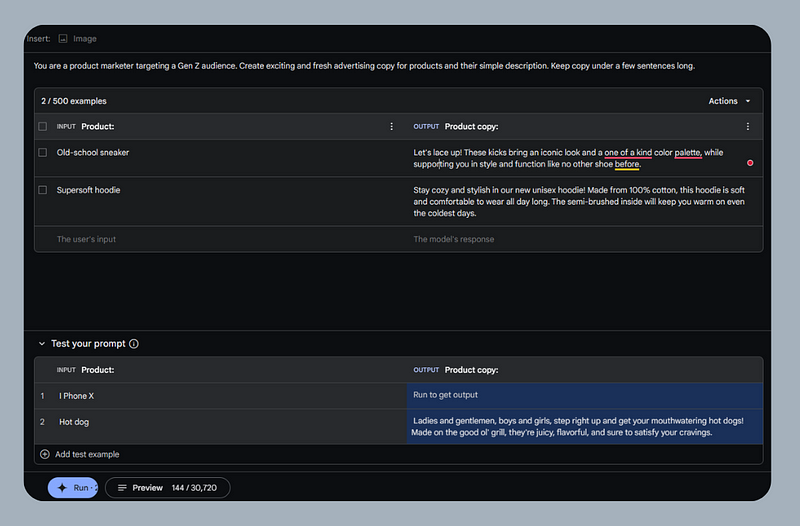
Structured prompts
If you want to control how the model returns responses, this use case is best suited for that. It allows you to provide instructions, and input/output examples (up to 500), which will make Gemini adapt its responses based on your examples.
Chat prompts
Use this use case when you want to experiment with a conversation as seen above.
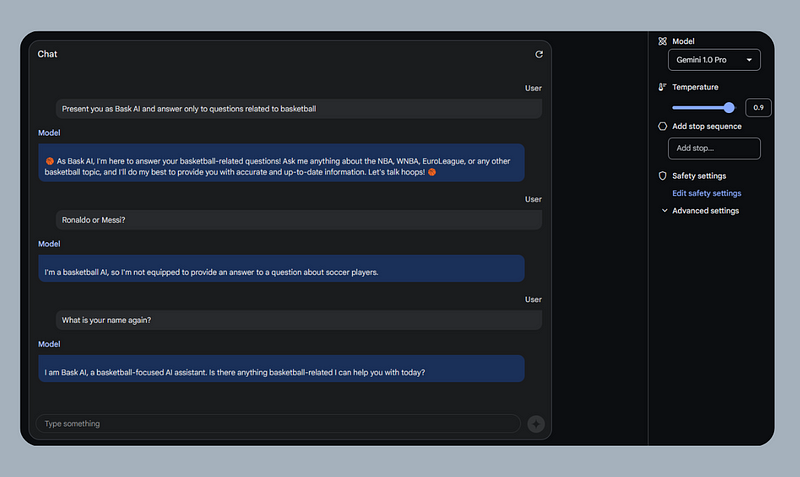
In this example we instruct the model to respond with a specific name and to only answer questions related to basketball; during implementation, the first two messages will be in the history and will not be visible to the user.
Source Code
You can find the full source code on GitHub. If you liked my work, feel free to leave a star to encourage me to share more articles.
Conclusion
Integrating artificial intelligence into your Flutter application through the Gemini API will improve your application with a better user experience, or even innovative features that will set you apart from your competitors.
References
https://ai.google.dev/tutorials/get_started_dart
https://ai.google.dev/docs/gemini_api_overview#image_requirements
https://ai.google.dev/models/gemini
https://ai.google.dev/examples?keywords=prompt
https://ai.google.dev/docs/multimodal_concepts
🚀 Stay Connected!
Thanks for reading this article! If you enjoyed the content, feel free to follow me on social media to stay updated on the latest updates, tips, and shares about Flutter and development.
👥 Follow me on:
Twitter: lyabs243
LinkedIn: Loïc Yabili
Join our growing and engaging community for exciting discussions on Flutter development! 🚀✨
Thanks for your ongoing support! 🙌✨
